Auto Menus (TS only)
Select Maintenance > Menu > Auto Menus to access this function.
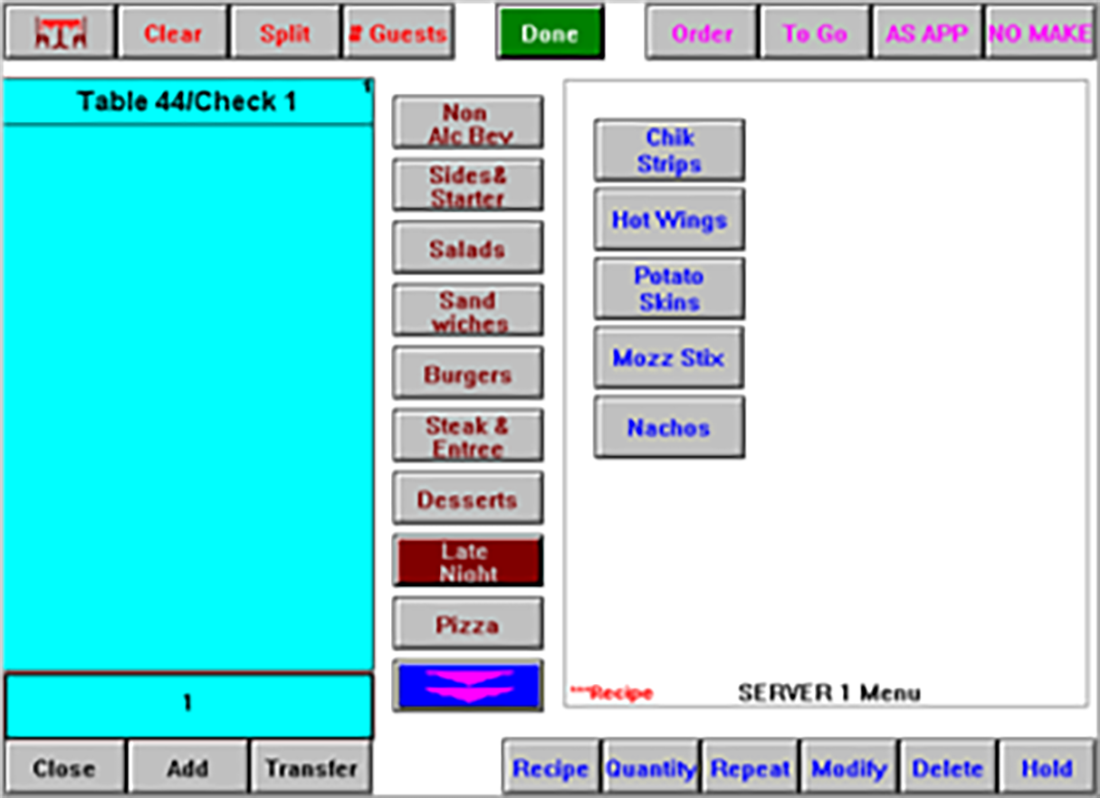
Use the Auto Menu function to overwrite existing submenus and create a menu without assigning items to buttons on a submenu. The Aloha POS system supports up to 9999 auto menus. The Auto Menus function works in conjunction with the event scheduler and provides a quick and simple way to implement daily menu changes. For example, a restaurant has a late night menu at a reduced price. The items sold on the regular priced menu during the operating hours of 10:00 a.m. to 10:00 p.m. are sold at a reduced rate during the hours of 10:00 p.m. to 2:00 a.m. The store configures an Auto Menu with a limited number of reduced items, names it ‘Late Night’, and schedules it using the Set Auto Menu event type in Events Schedule to appear every night at 10:00 p.m.
The items presented on an auto menu appear sorted first per either their ‘Position priority,’ or ‘Default priority,’ which is determined by the restaurant, and then alphabetically by their short names. You must price the items using the Fixed Item Pricing function. For example, if Hot Wings, Chicken Strips, and Potato Skins are assigned a priority of one, and Nachos and Mozz Stix are assigned a priority of two, they appear on the auto menu as shown in the following example:

Auto Menu tab
Use the Auto Menu tab to configure a unique name/number identifier for the auto menu.
Group Bar: Identification
Name — Identifies the auto menu.
Items tab
The Items tab enables you to assign one or more items to the auto menu, by moving items from the ‘Available’ list on the left side of the screen to the ‘Included’ list on the right side of the screen.
Note: Only items assigned to Sales or Retail categories appear in the ‘Available’ list.
You have the unique ability with Submenus to access Maintenance > Business > Installed Products > Global tab and define the number of submenu rows and columns to display more or less items on each of the two submenu pages under the ‘Menus’ group bar. Since auto menus overwrite submenus, the maximum number of items that can appear as active on an auto menu is the lesser of the following:
42 or 2 x (Submenu rows x Submenu columns).
Group Bar: Items
Use the >> and << arrows to move items between the ‘Available’ list and the ‘Included’ list. The column headings that appear in the ‘Available’ list are as follows:
Name — Identifies the long name assigned to the item.
Sales/retail category — Indicates the category assigned to the item (i.e., sales, retail, or general).
The column headings that appear in the ‘Included’ list are as follows:
Name — Identifies the long name assigned to the item.
Position priority — Indicates the placement of an item on an auto menu. Items appear per the priority entered here, and then alphabetically by their short name. A valid range is from 0 (zero) to 255, with an item assigned a priority of 1 appearing above an item assigned a priority of 255. A value of 0 indicates to use the value in ‘Default priority.’ Related Options: If you do not specify a value here, the system uses the value defined for ‘Priority’ under the ‘Auto menu’ group bar in Maintenance > Menu > Items > Item tab.
Note: You can assign the same priority to multiple items.
Default priority — Indicates the ‘Priority’ defined for the item under the ‘Auto menu’ group bar in Maintenance > Menu > Items > Item tab. When ‘Position priority’ is set to ‘0,’ the POS uses the value in ‘Default priority’ to determine placement on the auto menu.