Video Controllers
Select Maintenance > Hardware > Video Controllers to access this function.
The Video Controllers function is required only when you interface with a third-party video software provider, such as QSR and Progressive. This function controls the configuration for two key components of the video set up process: Devices and Keypads. Use the options on the Device tab to set up and define the video devices used in the food preparation areas. Required Options: You must select ‘Display VideoMX’ under the ‘Options to display’ group bar in Maintenance > Business > Additional Features to expose this function.
Video Controller types
When you create a new video controller, you must select the type of controller to create. The type of controller you select determines the options that appear for configuration. Select from the following types, when you click the New drop-down-arrow to add a new video controller:
- Aloha
- IBM
- Progressive
- Select
- QSR
- Radiant
Note: If using Select or IBM Video, determine the device number prior to defining devices. To do this, remove the video controller case to read the pin jumps.
Use the options on the Keypad tab to designate the ASCII or keyboard character used to perform the corresponding function. The system supports cell layouts containing either variable cell lengths, or cells of the same size. You can define the number of rows and columns, and include an ending summary cell as the last cell. The system also supports the display of two video queues on the same monitor.
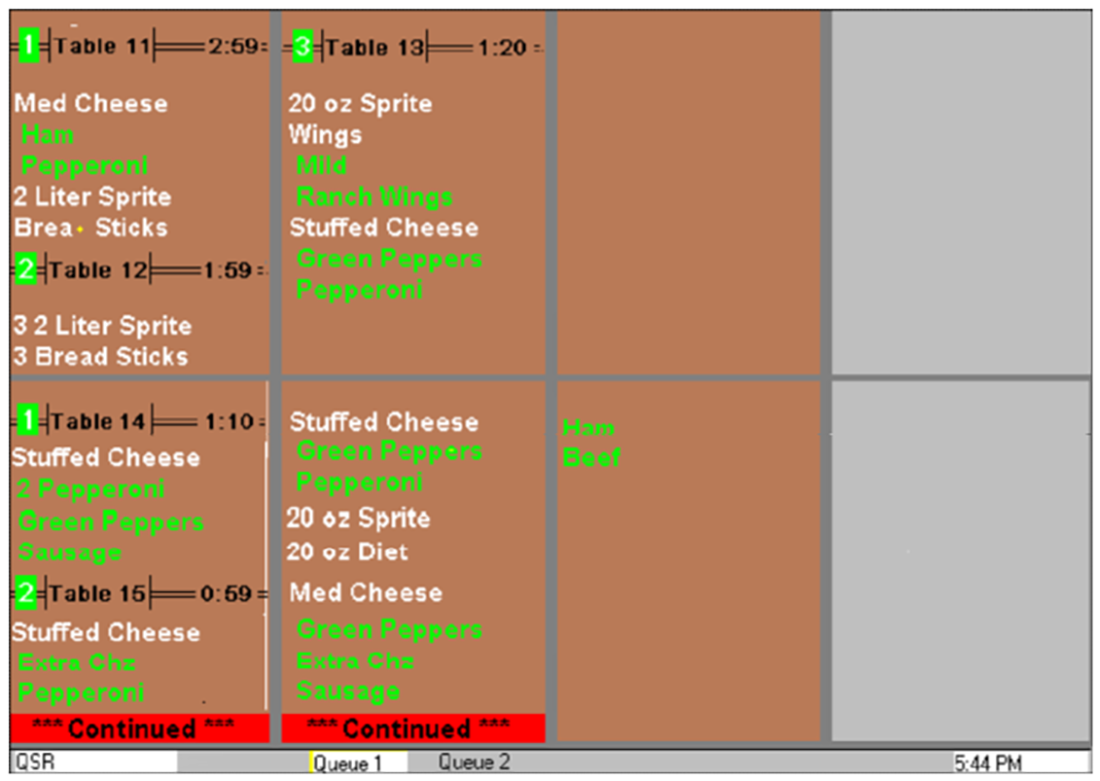
When using variable cell lengths, the system generates a vertical line to separate each column. A blank line that acts as a separator between orders follows each order. The system numbers cells vertically and reserves space on the last order cell for the scroll indicators, the summary cell, and each cell heading.
The system initially displays a complete order starting at the top of the leftmost column. When the screen is full and there is not enough room to display an entire order, the system shows a partial order with the header, the first item, the ‘continued’ indicator, and the scroll indicator. You can bump an order that is currently visible on the screen, including partial orders, but you can not bump hidden orders (orders that are not visible on the screen).
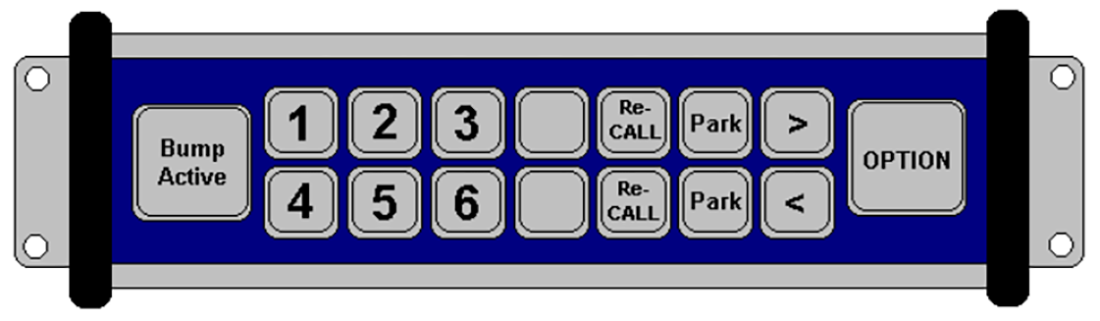
When you select a video device type, the Keypad tab populates with the default options for the physical bump bar; however, newer bump bar devices may require you to alter those configurations.
For example, if ‘Bump Cell Left’ populates with the letter ‘L,’ but the physical bump bar uses ‘<,’ change L to <. To bump to the left on the video screen, press <, located on the bump bar.
Use the Device tab to set up and define the video devices used in the food preparation areas.
Note: If using Select or IBM Video, determine the device number prior to defining devices. To do this, remove the video controller case to read the pin jumps.
Device tab
The Device tab enables you to set up and define the video devices used in the food preparation areas.
Group Bar: Settings
Name — Identifies the video device.
Note: When defining a new device, the system defaults to the next unassigned number, based on the number of the previous video device record. For example, if video device number 2 appeared previously on the video device tab, 3 appears as the next video device number. If 3 is already in use, 4 appears as the next video device number. If you want to select a different number, click the ellipsis (...) next to ‘Number’ to display the Number Assignment dialog box.
Device ID — Specifies the hardware ID number associated with the device.
Use touch screen — Enables the touch screen capability for the selected device.
Has keypad — Indicates the video controller device uses a bump bar with a keypad.
Group Bar: Cell layout
Variable cell length — Enables video cells to use variable lengths determined by the number of items in the order. If cleared, all video cells display with the same length. Progressive KPS does not support variable cell lengths.
Rows — Specifies the number of rows that appear on the video monitor. Type a maximum of 9 rows. The default is 2 rows. Rows are not supported with the variable cell length feature. Required Options: You must clear ‘Variable cell length’ to enable this option.
Columns — Specifies the number of columns that appear on the video monitor. Type a maximum of 9 columns. The default is 4 columns.
Number of summary cells — Indicates the number of cells the Summary screen covers when activated. The Summary screen accumulates orders in finalized mode and shows how many of each item needs to be made. You can toggle the Summary screen on and off, as needed.
Group Bar: Window position
Top — Indicates the starting ‘Y’ coordinate for the top, left corner of the window display.
Left — Indicates the starting ‘X’ coordinate for the top, left corner of the window display.
Width — Specifies the width, in pixels, of the video image.
Height — Specifies the height, in pixels, of the video image.
Group Bar: Chit names
Change chit names — Allows you to select an alternate chit name for output.
Default chit name — Allows either the chit name, the alternative name, or both to appear on the window display. Related Requirements: You must select ‘Change chit names’ to expose this option.
Keypad tab
The Keypad tab enables you to configure the key pad navigation options for the bump bar.
Group Bar: Settings
Keypad ID — Specifies the unique identifier for the keypad.
Bump 1st cell through Bump 8th cell — Specifies the keypad characters you use to represent the bump 1st cell through 8th cell commands. The character options change, based on the type of device you select.
Scroll left — Specifies the keypad character you use to scroll left. The character options change, based on the type of device you select.
Scroll right — Specifies the keypad character you use to scroll right. The character options change, based on the type of device you select.
Recall last order — Specifies the keypad character you use to recall the last order, if desired. The character options change, based on the type of device you select.
Summary on/off — Specifies the keypad character you use to toggle the summary on and off, as desired. The character options change, based on the type of device you select.
Refresh display — Specifies the keypad character you use to refresh the screen display. The character options change, based on the type of device you select.
Toggle queue — Specifies the keypad character you use to toggle the view back and forth, between queues.
Toggle split screen — Specifies the keypad character you use to toggle the split screen focus between queues. The character options change, based on the type of device you select.
Toggle queue on/off — Specifies the keypad character you use to activate the ‘toggle queue on’ and ‘toggle queue off’ commands. The character options change, based on the type of device you select.