Store > Store Settings tab > Chit Printing group
Select Maintenance > Business > Store to access the Store function. The Store function enables you to configure default system settings for your store. The system automatically creates a store record during the system installation/import process and the function separates options in this record into groups, based on the area of the Aloha POS system affected by your selections. Select the Chit Printing group located at the bottom of the screen.
Chit Printing group
Use the options in the Chit Printing group to define:
- The content to print on the chit, such as a summary section of items, consolidation of items, and if previously ordered items print with new items.
- The line space to leave at the top and the bottom of the chit for proper aligning and centering.
- The sorting of items and modifiers.
- Other requirements you need to print on the chit, such as consolidation, the order time in bold, the check number, a quantity number next to items, and how modifiers display on the chit.
- Table tents, such as how you increment the table tent number, and user-defined messages to display as prompts.
- Production chits, such as tray chit printing and expediter chit printing.
- Chit printing requirements when you perform a void.
Chit types
Regular chits print items ordered per station. When pivot seating is enabled, item and seating information are included.
Tray chits are used in a pivot seating environment by the person assembling the order and distributing it to the table by seat position. This feature provides the kitchen with a summary of the order contents, and the seat number to which each item belongs. All items from an order print on the tray chit, including the items routed to a specific printer station. The chit prints the summary by seating arrangement.
Expediter chits are like a tray chit, except they print a summary grouped by like items, instead of by seating arrangement.
Group Bar: Kitchen chit id="content"> Content
Print check number — Prints the check number on the chit.
Print guest count (TS only) — Prints the number of guests on the chit.
Print club member name (TS only) — Prints the member’s name on the chit.
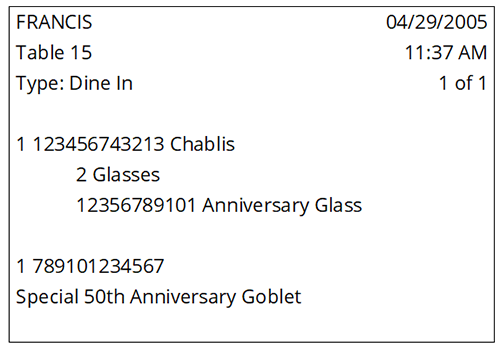
Print SKU Number — Prints the SKU number of the item on the chit. Required Options: Access Maintenance > Menu > Items > SKU Numbers tab to define up to five SKU numbers per item. If you order the item with a scanner, the system prints the appropriate SKU number. If you order the item without a scanner, the system prints the first available SKU number, found vertically in the list of SKU numbers. The system prints the SKU number before each item and its modifiers, if applicable and found, as shown in the ‘Chablis’ line item. The SKU number does wraps to the next line, if necessary. If the SKU number and item cannot fit on the same line, the system prints the SKU number on the first line and the item name on the next line, as shown in the ‘Special 50th Anniversary Goblet’ line item. If the item does not have a SKU number, it prints as shown in the ‘2 Glasses’ line item.
Disable standalone chit printing — Prevents chit information from printing to a local printer. Standalone chit printing is for when the local terminal is the master and only terminal in use, therefore, all chits route to the local printer.
Print message if order contains items routed to more than one order printer — Prints message on the chit, if the system routes an order to multiple printers. The message is summarized at the bottom of the chit as follows:
More Items @
Print all items on all kitchen chits — Prints all items in an order that were not committed to an order mode. This is for a normal printing environment.
Print entire order including previously ordered items (QS only) — Prints all items in an order, regardless if previous items were committed to an order mode. For example, if you add a dessert to a check that contained a previously ordered entrée, both the dessert and the entrée print on the chit. Typically, you use this in Quick Service environments where you distribute the entire order at once.
Do not reprint chit when order mode is changed (QS only) — Does not reprint a chit for ordered items when the order mode changes, such as from ‘To-Go’ to ‘Dine-In.’ Typically, you use this in Quick Service environments.
Number of leading blank lines — Sets the number of blank lines to print at the beginning of the chit to allow for a readable chit, paper cutting, and the placement of chits on a ticket wheel, or bar. Type a maximum of two digits.
Number of trailing blank lines — Sets the number of blank lines to print at the end of the chit to allow for a readable chit and paper cutting. Type a maximum of two digits.
Use full paper cuts — Cuts printed chits completely instead of partially.
Cut between courses on kitchen chits (TS only) — Provides a cut between each course on the chit that prints for the kitchen staff, when using the Course Ordering feature.
Reference: Refer to the Course Ordering Feature Focus Guide - HKS312 for more information on ordering with courses.
Maximum lines per chit — Sets the maximum number of lines you can print on the chit. If the order exceeds the maximum lines, the system breaks the chit into multiple chits and prints x of y at the bottom of each chit. Required Options: You must select a chit type of ‘Summary’ to enable this option.
Maximum items per chit — Sets the maximum number of items you can print on the chit. If the number exceeds the maximum items, the system breaks the chit into multiple chits and prints x of y at the bottom of each chit. Required Options: You must select a chit type of ‘Summary’ to enable this option.
Maximum seats per chit — Gets the maximum number of seats you can print on the chit. If the number exceeds the maximum seats, the system breaks the chit into multiple chits and prints x of y at the bottom of each chit. Required Options: You must select a chit type of ‘Summary’ to enable this option.
Sort items by priority — Causes menu items to print on the chit using their assigned ‘Priority.’ The Course Ordering feature also respects the value entered for ‘Priority’ when you use the course entry screen to assign courses. Related Options: To assign a priority to an item, access Maintenance > Menu > Item Routing > Item Routing tab and enter a value between 1 and 255 in ‘Priority’ under the ‘Routing Assignment’ group bar.
Print a separator line between priority — Prints a separator line between menu items with different priorities. Required Options: This works in conjunction with ‘Sort items by priority.’
Modifier sorting method — Sorts the modifier on the chit per the method you select.
As entered — Displays modifiers in the order you enter them for the item.
By priority, modifier group, name — (1) Sorts alphabetically based on the priority defined for the modifier in Maintenance > Menu > Items > Item tab under the ‘Auto menu’ group bar. (2) If modifiers have the same priority, they sort alphabetically based on the order of the modifier groups attached to the menu item.
By modifier group, priority, name — (1) Sorts alphabetically based on the order of the modifier groups attached to the menu item. (2) Sorts alphabetically based on the priority defined in Maintenance > Menu > Items > Item tab under the ‘Auto menu’ group bar.
By priority only — (1) Sorts alphabetically based on the priority defined for the modifier in Maintenance > Menu > Items > Item tab under the ‘Auto menu’ group bar.
Use highest modifier priority if greater than item priority — If a modifier has a higher priority than the item it modifies, the entire item takes on the higher priority.
Expediter printer — Designates the printer to which a chit containing all menu items for orders will print. An order split between two or more printer groups in the kitchen also prints in its entirety on the expediter printer. Orders not split between printer groups have no effect on the expediter. When you modify a printer, the change applies to all areas assigned to that printer. Required Options: This option only affects the printers defined in Maintenance > Hardware > Printers > Options tab with ‘In kitchen’ selected under the ‘Option settings’ group bar.
Expedite even when items only route to one printer — Prints an expediter chit when the system routes all ordered items to one kitchen printer. If cleared, expediter chits print when the system splits an order between two or more kitchen printers.
Cut between courses on expediter chits (TS only) — Provides a cut between each course on the chit that prints for the expediter staff, when using the Course Ordering feature.
Reference: Refer to the Course Ordering Feature Focus Guide - HKS312 for more information on ordering with courses.
Group Bar: Appearance
Use large font — Prints the chit in a larger font than the default size.
Print double height text — Doubles the default height of the text.
Print order mode in red — Prints the selected order mode(s) in red ink on the chit.
Print entrees in bold (TS only) — Prints entrées in bold type.
Print chit time in bold — Prints the time header information in bold type.
Print table number in red (TS only) — Prints table numbers in red when printed on color printers, or in reverse type on monochrome printers.
Print native items in bold — Prints items in bold, at the designated printer for the items, when used as modifiers. For example, a salad used as a modifier for a steak, prints in bold at the salad prep printer, and normally at the grill printer. When ordered as a menu item, the salad prints normally at both the salad prep printer and at the grill printer.
Print open item indicators — Prints the preceding and succeeding exclamation point indicators when you enter the item using a QWERTY keyboard. Related Options: To define open items to print in red, select ‘Print open items in red.’
Print open items in red — Prints the entry in red when you type the item using a QWERTY keyboard. Related Options: To define open item indicators on the chit, select ‘Print open item indicators.’
Print modifiers in red — Prints all modifiers in red ink when printed on color printers, or in reverse type on monochrome printers.
Print items in red if flagged as ‘Highlight if modifier’ — Prints modifier items defined to highlight in red ink, when printed on color printers. On some printers, the item may display in reverse type. Related Options: To define items to display highlighted, access Maintenance > Menu > Items > Modifier tab and select ‘Highlight if modifier’ under the ‘If used as a modifier’ group bar.
Print No, Extra, Side, etc. modifier items in bold — Prints items with No, Side, Extra, and Sub in bold type.
Print No, Extra, Side, etc. modifier items in red — Prints items with No, Side, Extra, and Sub in red type.
Group quick combo items — Prints items that are part of a quick combo promotion together on the chit.
Consolidate items with identical modifiers — Consolidates like items with the same modifiers on the chit. Related Options: To apply consolidation to a table using pivot seating, select “Consolidate ‘For Table’ items only.”
2 TBone
Rare
Salad
Beans
Consolidate items with different modifiers — Consolidates like items on the chit even if the modifiers are not the same.(TS only) Related Options: To apply consolidation to a table using pivot seating, select “Consolidate ‘For Table’ items only.”
2 TBone
1 Rare
Salad
Beans
1 Medium Rare
Salad
Beans
Consolidate ‘For Table’ items only (TS only) — Applies consolidation rules to items going to the entire table when you are using ‘Pivot Seating.’ This accommodates banquet environments. The following example shows table consolidation with identical modifiers. Required Options: 1) You must select either ‘Consolidate items with identical modifiers’ or ‘Consolidate items with different modifiers’ to enable this option. 2) To enable pivot seating for all employees to use, access Maintenance > Business > Store > Store Settings tab > Order Entry group and select ‘Enable Pivot Seating’ under the ‘Guest Count’ group bar. 3) To enable pivot seating by job code, access Maintenance > Labor > Jobcodes > Order Entry tab and select ‘Pivot seating’ under the ‘Order entry’ group bar. 4) To enable pivot seating by revenue center, access Maintenance > System Settings > Revenue Center > Options tab and select ‘Enable pivot seating’ under the ‘Guest count tracking’ group bar.
2 TBone
Rare
Salad
Beans
The following example shows table consolidation with different modifiers:
2 T-Bone
1 Rare
Salad
1 Medium Rare
Salad
Print ‘1’ in front of single quantity — Prints a ‘1’ in front of any item that is ordered without another like item, instead of ‘>.
1 TBone
1 Rare
1 Salad
1 Beans
Print parenthesis for quantity items — Prints the total number of like items in parenthesis in front of the item.
(6) BBQ Sandwich
Default item justification — Enables items to print with left, right, or centered justification.
No, Extra, Side, etc. modifier items justification — Enables No, Side, Extra, and Sub to print with left, right, or centered justification.
Wraparound modifiers — Determines how modifiers appear on the chit.
One line per modifier — Prints one line per modifier under the item being modified. (Default)
Contiguous, on same line as item — Prints modifiers as one single line along with the item being modified.
2 TBone Rare Salad Beans
Contiguous, on next line following item — Prints modifiers as one single line under the item being modified.
2 TBone
Rare
Salad
Beans
Wraparound modifier tab stops — Specifies the number of characters used to separate each modifier. Required Options: You must select a wraparound type of ‘Contiguous, on same line as item’ or ‘Contiguous, on next line following item.’
Group Bar: Tray Chits
Print tray chits — Enables tray chit printing on the printer you select in ‘Tray chit printer,’ and enables all other options under the ‘Tray Chits’ group bar. (TS only) This option facilitates the use of sub-orders. Items print to their designated printer routings and the expediter receives a full chit with all items listed for their sub-orders. This option, used with the Pivot Seating feature, facilitates tray setups, particularly when orders are split between printer groups.
Tray chit printer — Specifies the printer to use for tray chit printing. (TS only) When you modify a printer, the change applies to all areas assigned to that printer.
Do not print items from this category — Enables the tray chit printer to exclude the category of items specified in ‘Excluded category.’ (QS only) This feature, when used with sub-orders, ensures that a category of items, such as Beverages does not print on kitchen chits. (TS only) Access Maintenance > Labor > Jobcodes > Order Entry tab and select ‘Pivot seating’ under the ‘Order entry’ group bar, to ensure that a category of items, such as Beverages, does not print on kitchen chits.
Excluded category — Specifies the category of items to exclude from printing on chits. When you modify a category, the change applies to all items assigned to that category. Required Options: You must select ‘Do not print items from this category’ to enable this option.
Do not print modifier items — Prevents printing the modifiers on the tray chit.
Maximum seats per tray chit — Sets the maximum number of seats per tray for each chit. If the order exceeds the maximum lines, the system breaks the chit into multiple chits and prints x of y at the bottom of each chit. Valid options range from 0 to 99.
Group Bar: Order Taker Chits
Print order taker chits — Prints order taker chits and enables you to define a message to print on the chit. Related Options: To define an employee as an order taker, access Maintenance > Labor > Jobcodes > Order Entry tab, select ‘Order taker’ under the ‘Order entry’ group bar, and assign the job code to the employee.
Text line 1 through Text line 5 — Specifies one to five lines of message text to print on the order taker chit.
Group Bar: Table Tents (QS only)
Table tents are physical markers placed on the table, by either the guest or the employee, to reduce the time a guest spends in line, and to help identify the table for order delivery. This is common in a counter environment that does not employ the use of table numbers, and when orders require preparation time. When enabled, the Aloha system requires you to enter a table tent number when you send an order to the kitchen that contains an item routed to a printer group. For example, if you only order a non-alcoholic beverage, which is commonly not routed to a printer, the table tent prompt does not appear.
Scenario: The guest orders a pizza from the front counter. The employee takes a physical table tent with a number, hands it to the guest, and enters the same number when sending the order. The guest places the table tent at his table. The employee delivers the order to the correct table by comparing the number on the chit or guest check with the number on the table tent.
You can assign only one table tent number per check. The number you type appears on the chit, guest check, and in the Change Due message box. It does not appear on the video screen, if you are using a remote display systems add-on. In operations where you wish to name certain orders with the ‘Name Order’ function, instead of using the table tent prompt, select ‘Do not use table tent for named orders’ under this group bar.
There are two FOH options for entering table tent numbers. The system automatically increments the table tent number by one for each order. You can override the system generated number and type the number for each order, which starts a new numbering sequence. You can also use the ‘Force Sequence’ option to allow the system to keep the same numbering sequence and offer you the next table number, which you can accept or skip. Both options accommodate situations when a physical table tent is lost, damaged, or not placed in order.
Use table tent numbers — Activates the Table Tent feature and enables the remaining options under the ‘Table Tents’ group box.
Minimum tent number — Designates the beginning number in the series. Type a number up to 9998 and lower than the ‘Maximum tent number.’ Leave this text box blank if you want to always manually enter the table tent number in the FOH.
Maximum tent number — Designates the ending number in the series. Type a number up to 9999 and higher than the ‘Minimum tent number.’ Leave this text box blank to always manually enter the table tent number in the FOH.
On-screen prompt — Designates the text for the prompt in the FOH Change Due message box, such as ‘Tent #.’
Guest check text — Designates the message line to appear on the guest check, such as ‘Order #.’
Chit text — Designates the message line to appear on the chit, such as ‘Order #.’
Do not use table tent for named orders — Does not prompt for a table tent number when you perform a Name Order function before you send the item to the kitchen. Related Requirement: To add the Name Order button function, access Maintenance > Screen Designer > Quick Service Screen Designer > Work with Panels, and then add the Name Order button function to the appropriate currently used panel.
Scenario 1: Type an item for the order, name the order with the Name Order function, then send the order to the kitchen. The table tent prompt does not appear.
Scenario 2: Type an item for the order, send the item to the kitchen with an available order mode, then name the order with the Name Order function. The table tent prompt appears.
Force sequential number entry — Retains the original numbering sequence as defined in the minimum and maximum tent numbers. You cannot manually enter a table tent number, but you can skip the offered table tent number and accept the next available number in sequence.